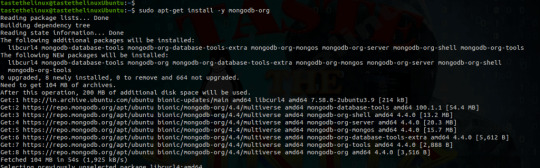
#mongodb install ubuntu 18
Explore tagged Tumblr posts
Visit Tumblr Blog
Explore Tumblr blogs with no restrictions, modern design and the best experience.
Last Seen Tumblr Blogs


Fun Fact
Users from the US are the majority of Tumblr visitors.
Text
PROJETO
Passo a Passo da Implementação da NeoSphere
1. Configuração do Ambiente de Desenvolvimento
Ferramentas Necessárias:
Python 3.10+ para backend Web2 (FastAPI, Redis).
Node.js 18+ para serviços Web3 e frontend.
Solidity para smart contracts.
Docker para conteinerização de serviços (Redis, MongoDB, RabbitMQ).
Truffle/Hardhat para desenvolvimento de smart contracts.
# Instalação de dependências básicas (Linux/Ubuntu) sudo apt-get update sudo apt-get install -y python3.10 nodejs npm docker.io
2. Implementação da API Web2 com FastAPI
Estrutura do Projeto:
/neosphere-api ├── app/ │ ├── __init__.py │ ├── main.py # Ponto de entrada da API │ ├── models.py # Modelos Pydantic │ └── database.py # Conexão com MongoDB └── requirements.txt
Código Expandido (app/main.py):
from fastapi import FastAPI, Depends, HTTPException from pymongo import MongoClient from pymongo.errors import DuplicateKeyError from app.models import PostCreate, PostResponse from app.database import get_db import uuid import datetime app = FastAPI(title="NeoSphere API", version="0.2.0") @app.post("/posts/", response_model=PostResponse, status_code=201) async def create_post(post: PostCreate, db=Depends(get_db)): post_id = str(uuid.uuid4()) post_data = { "post_id": post_id, "user_id": post.user_id, "content": post.content, "media_urls": post.media_urls or [], "related_nft_id": post.related_nft_id, "created_at": datetime.datetime.utcnow(), "likes": 0, "comments_count": 0 } try: db.posts.insert_one(post_data) except DuplicateKeyError: raise HTTPException(status_code=400, detail="Post ID já existe") return post_data @app.get("/posts/{post_id}", response_model=PostResponse) async def get_post(post_id: str, db=Depends(get_db)): post = db.posts.find_one({"post_id": post_id}) if not post: raise HTTPException(status_code=404, detail="Post não encontrado") return post
3. Sistema de Cache com Redis para NFTs
Implementação Avançada (services/nft_cache.py):
import redis from tenacity import retry, stop_after_attempt, wait_fixed from config import settings class NFTCache: def __init__(self): self.client = redis.Redis( host=settings.REDIS_HOST, port=settings.REDIS_PORT, decode_responses=True ) @retry(stop=stop_after_attempt(3), wait=wait_fixed(0.5)) async def get_metadata(self, contract_address: str, token_id: str) -> dict: cache_key = f"nft:{contract_address}:{token_id}" cached_data = self.client.get(cache_key) if cached_data: return json.loads(cached_data) # Lógica de busca na blockchain metadata = await BlockchainService.fetch_metadata(contract_address, token_id) if metadata: self.client.setex( cache_key, settings.NFT_CACHE_TTL, json.dumps(metadata) ) return metadata def invalidate_cache(self, contract_address: str, token_id: str): self.client.delete(f"nft:{contract_address}:{token_id}")
4. Smart Contract para NFTs com Royalties (Arquivo Completo)
Contrato Completo (contracts/NeoSphereNFT.sol):
// SPDX-License-Identifier: MIT pragma solidity ^0.8.20; import "@openzeppelin/contracts/token/ERC721/ERC721.sol"; import "@openzeppelin/contracts/access/Ownable.sol"; import "@openzeppelin/contracts/interfaces/IERC2981.sol"; contract NeoSphereNFT is ERC721, Ownable, IERC2981 { using Counters for Counters.Counter; Counters.Counter private _tokenIdCounter; struct RoyaltyInfo { address recipient; uint96 percentage; } mapping(uint256 => RoyaltyInfo) private _royalties; mapping(uint256 => string) private _tokenURIs; event NFTMinted( uint256 indexed tokenId, address indexed owner, string tokenURI, address creator ); constructor() ERC721("NeoSphereNFT", "NSPH") Ownable(msg.sender) {} function mint( address to, string memory uri, address royaltyRecipient, uint96 royaltyPercentage ) external onlyOwner returns (uint256) { require(royaltyPercentage <= 10000, "Royalties max 100%"); uint256 tokenId = _tokenIdCounter.current(); _tokenIdCounter.increment(); _safeMint(to, tokenId); _setTokenURI(tokenId, uri); _setRoyaltyInfo(tokenId, royaltyRecipient, royaltyPercentage); emit NFTMinted(tokenId, to, uri, msg.sender); return tokenId; } function royaltyInfo( uint256 tokenId, uint256 salePrice ) external view override returns (address, uint256) { RoyaltyInfo memory info = _royalties[tokenId]; return ( info.recipient, (salePrice * info.percentage) / 10000 ); } function _setTokenURI(uint256 tokenId, string memory uri) internal { _tokenURIs[tokenId] = uri; } function _setRoyaltyInfo( uint256 tokenId, address recipient, uint96 percentage ) internal { _royalties[tokenId] = RoyaltyInfo(recipient, percentage); } }
5. Sistema de Pagamentos com Gateway Unificado
Implementação Completa (payment/gateway.py):
from abc import ABC, abstractmethod from typing import Dict, Optional from pydantic import BaseModel class PaymentRequest(BaseModel): amount: float currency: str method: str user_metadata: Dict payment_metadata: Dict class PaymentProvider(ABC): @abstractmethod def process_payment(self, request: PaymentRequest) -> Dict: pass class StripeACHProvider(PaymentProvider): def process_payment(self, request: PaymentRequest) -> Dict: # Implementação real usando a SDK do Stripe return { "status": "success", "transaction_id": "stripe_tx_123", "fee": request.amount * 0.02 } class NeoPaymentGateway: def __init__(self): self.providers = { "ach": StripeACHProvider(), # Adicionar outros provedores } def process_payment(self, request: PaymentRequest) -> Dict: provider = self.providers.get(request.method.lower()) if not provider: raise ValueError("Método de pagamento não suportado") # Validação adicional if request.currency not in ["USD", "BRL"]: raise ValueError("Moeda não suportada") return provider.process_payment(request) # Exemplo de uso: # gateway = NeoPaymentGateway() # resultado = gateway.process_payment(PaymentRequest( # amount=100.00, # currency="USD", # method="ACH", # user_metadata={"country": "US"}, # payment_metadata={"account_number": "..."} # ))
6. Autenticação Web3 com SIWE
Implementação no Frontend (React):
import { useSigner } from 'wagmi' import { SiweMessage } from 'siwe' const AuthButton = () => { const { data: signer } = useSigner() const handleLogin = async () => { const message = new SiweMessage({ domain: window.location.host, address: await signer.getAddress(), statement: 'Bem-vindo à NeoSphere!', uri: window.location.origin, version: '1', chainId: 137 // Polygon Mainnet }) const signature = await signer.signMessage(message.prepareMessage()) // Verificação no backend const response = await fetch('/api/auth/login', { method: 'POST', headers: { 'Content-Type': 'application/json' }, body: JSON.stringify({ message, signature }) }) if (response.ok) { console.log('Autenticado com sucesso!') } } return ( <button onClick={handleLogin}> Conectar Wallet </button> ) }
7. Estratégia de Implantação
Infraestrutura com Terraform:
# infra/main.tf provider "aws" { region = "us-east-1" } module "neosphere_cluster" { source = "terraform-aws-modules/ecs/aws" cluster_name = "neosphere-prod" fargate_capacity_providers = ["FARGATE"] services = { api = { cpu = 512 memory = 1024 port = 8000 } payment = { cpu = 256 memory = 512 port = 3000 } } } resource "aws_elasticache_cluster" "redis" { cluster_id = "neosphere-redis" engine = "redis" node_type = "cache.t3.micro" num_cache_nodes = 1 parameter_group_name = "default.redis6.x" }
Considerações Finais
Testes Automatizados:
Implementar testes end-to-end com Cypress para fluxos de usuário
Testes de carga com k6 para validar escalabilidade
Testes de segurança com OWASP ZAP
Monitoramento:
Configurar Prometheus + Grafana para métricas em tempo real
Integrar Sentry para captura de erros no frontend
CI/CD:
Pipeline com GitHub Actions para deploy automático
Verificação de smart contracts com Slither
Documentação:
Swagger para API REST
Storybook para componentes UI
Archimate para documentação de arquitetura
Este esqueleto técnico fornece a base para uma implementação robusta da NeoSphere, combinando as melhores práticas de desenvolvimento Web2 com as inovações da Web3.
0 notes
Text
How to Install MongoDB Ubuntu 20.04 Linux.
How to Install MongoDB Ubuntu 20.04 Linux.
Hi Techies! Will look at “How to install MongoDB on Ubuntu 20.04” Linux. MongoDB is a No-SQL database. Which is written in C++, It uses a JSON like structure. MongoDB is a cross-platform and document-oriented database. The initial release of the MongoDB was on 11 February 2009, you can find the main website of the MongoDB as well the git repository 10gen software company began developing…
View On WordPress
#install mongodb#install mongodb on linux#install mongodb on ubuntu#install mongodb on ubuntu 18.04#install mongodb on ubuntu 20.04#mongodb install linux#mongodb install ubuntu#mongodb install ubuntu 16.04#mongodb install ubuntu 18#mongodb install ubuntu 20.04
0 notes
Text
Robo 3t connect to mongodb

ROBO 3T CONNECT TO MONGODB HOW TO
ROBO 3T CONNECT TO MONGODB PASSWORD
Today, we saw the different suggestions our Support Engineers provide to resolve this MongoDB error. In short, this error ‘MongoDB failed to load the list of databases’ can occur due to various reasons that include failed database user/password authentication, outdated Robo 3T version, and so on. So we need to set these privileges for the users. If the user that we are trying to connect doesn’t have proper privileges to list the databases.įor Robomongo to list out the databases/collections, we must connect to our database using a user that has ‘listDatabases’ privileges. So we need to re-check the database user/password.įor that, access Connection Settings > Authentication – Provide Database name, username, password.Īfter that, we re-test the connection. It means that the server IP connection might be successful but the database might have not connected. If there is any failure in the database user/password authentication then this error can occur. In some of the cases that we saw, this error was fixed by just upgrading the Robo 3T version.Ģ. We suggest upgrading the Robo 3T version.
ROBO 3T CONNECT TO MONGODB HOW TO
Here are the different ways to resolve the error.ġ. Will go over how to install and set up MongoDB on windows and then connect it to Robot3T, since I havent found any really great content about how to do it. Now let’s see the different suggestions our Support Engineers provide to resolve this error message. How we resolve ‘MongoDB failed to load the list of databases’ Today, let us see how our Support Engineers resolve this MongoDB error message. Here at Bobcares, we have seen several such MongoDB errors as part of our Server Management Services for web hosts and online service providers. This error can occur due to various reasons that include failed database user/password authentication, outdated Robo 3T version, and so on. ns file size for new databases.Few of our customers received an error ‘MongoDB failed to load the list of databases’ while trying to connect to a remote database using Robomongo. Any query that would do a table scan fails. Save the changes and press connect icon to see if the connection is working fine. The timer will be disabled when ETL is going. I have a timer that triggers every 5 seconds and does the migration for a particular date range. The source and target table can be the same in the same database. The database can be in a different MongoDB server. Here, I have entered my Ubuntu 18 Vagrant box ssh credentials. I have a Mongo DB ETL application that will transfer data from one database to another database.
ROBO 3T CONNECT TO MONGODB PASSWORD
Enter mongodb admin database username and password which you have created earlier. Launch Robo 3T and open the ‘Manage Connections’ window: Click on ‘Create’ to setup a new connection.
# Enable the HTTP interface (Defaults to port 28017). On Robo 3T GUI, in the connection settings, you need to do few changes as shown on below screen shots. Connection String: mongodb://admin::27017/adminssltrue Server Name: Port: 27017 Setting Up a New Connection on Robo 3T.
# Inspect all client data for validity on receipt (useful for # Enables periodic logging of CPU utilization and I/O wait # E.g., if the parent directory isn't mutable by the MongoDB user. If you want to secure the traffic to database, you can configure the SSL settings as the below. b) Input User and Password information in Authentication tab. # need to create and set permissions for this directory manually. a) Input connection information in Connection tab. # Note: if you run MongoDB as a non-root user (recommended) you may I commented out bind_ip and uncommented port. I was able to connect using the following nf file. You need to edit your /etc/nf file's bind_ip variable to include the IP of the computer you're using, or eliminate it altogether. It is a better idea to add more IP addresses than to open up your system to everything. For Standard plans, the connection information is quite straightforward. Note: Commenting out bind_ip can make your system vulnerable to security flaws. 1) Find out connection information of your database in control panel.
0 notes
Link
Install the older version of MongoDB with the command sudo apt-get install mongodb -y. http://www.xhostcom.com/install-mongodb-on-ubuntu-server-18-04/
0 notes
Text
Instalar una pila LAMP o LEMP en Linux
Instalar una pila LAMP o LEMP en Linux. Una pila LAMP o LEMP (también conocida como "stack") es un paquete de aplicaciones y herramientas open source, que se instalan conjuntamente con el objetivo de adecuar un servidor para que pueda prestar sus servicios a sitios web dinámicos, y aplicaciones web. En las "stack / pilas" no es necesario que instales las aplicaciones y herramientas una por una, el paquete lo hará por ti. Existen muchas variantes, pero sin dudarlo una de las mejores alternativas es la que nos ofrece "lempstack.com", y no solo por la multitud de diferentes pilas que ofrece, sino por la calidad de sus stack. Las pilas que se nos ofrecen son las siguientes (ellos escriben "lnmp" en vez de "lemp" por que es realmente como se escribe): LNMP (Linux + Nginx+ MySQL/MongoDB+ PHP) LAMP (Linux + Apache+ MySQL/MongoDB+ PHP) LNMPA (Linux + Nginx+ MySQL/MongoDB+ PHP+ Apache): Nginx handling the static, Apache processing dynamic PHP LNMT (Linux + Nginx+ MySQL/MongoDB+ Tomcat) LNPP (Linux + Nginx+ PostgreSQL+ PHP) LAPP (Linux + Apache+ PostgreSQL+ PHP) LNMH (Linux + Nginx+ MySQL+ HHVM) Ademas son compatibles con multitud de SO: CentOS (redhat) 6-7 Debian 7-9 Ubuntu 12-18 Fedora 27-28 Deepin 15 Amazon Linux 2 Aliyun Linux Destacamos que las versiones que ofrecen siempre están actualizadas. Actualmente (14-03-2019) son las siguientes:
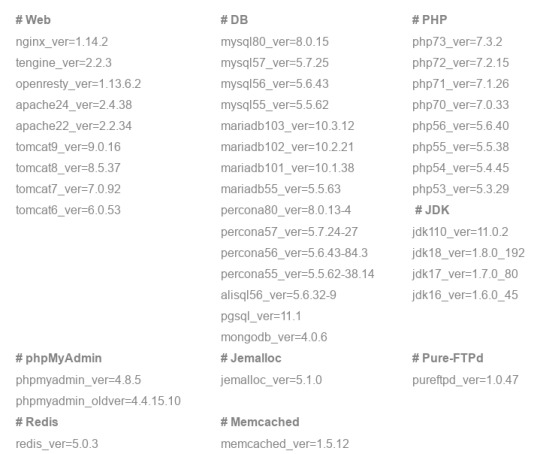
Como ves es bastante completa y actual, así que la instalamos.
Instalar una pila LAMP o LEMP
Para instalar nuestra stack debemos seleccionar la pila y sus componentes, lo hacemos desde su pagina oficial. Selecciona tu stack. Marca lo que te interese.
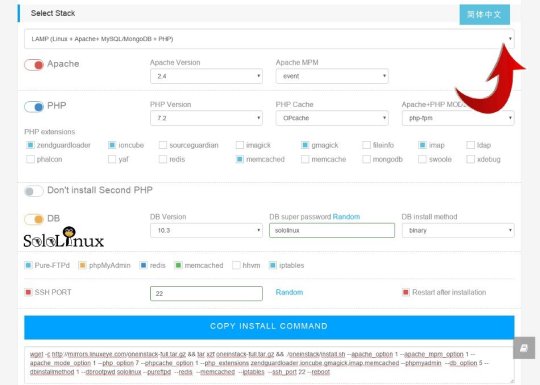
Una vez hayas creado la pila a tu gusto, copias el código que aparece en la parte inferior, lo pegas en la consola / terminal de tu vps o servidor, y lo ejecutas. Al finalizar la instalación te aparecerán los datos de acceso y diversas localizaciones.
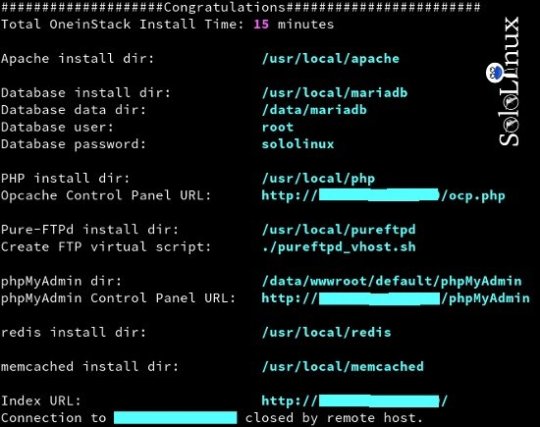
Para acceder y desde tu navegador web favorito, escribes la ip del server. http://tu-ip/ Accedes a la pantalla de control principal.
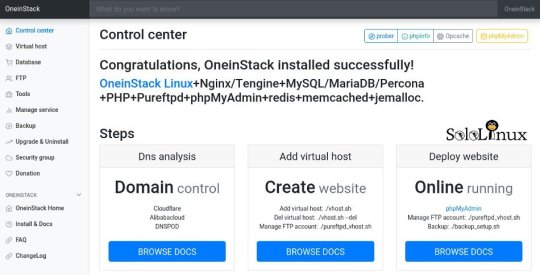
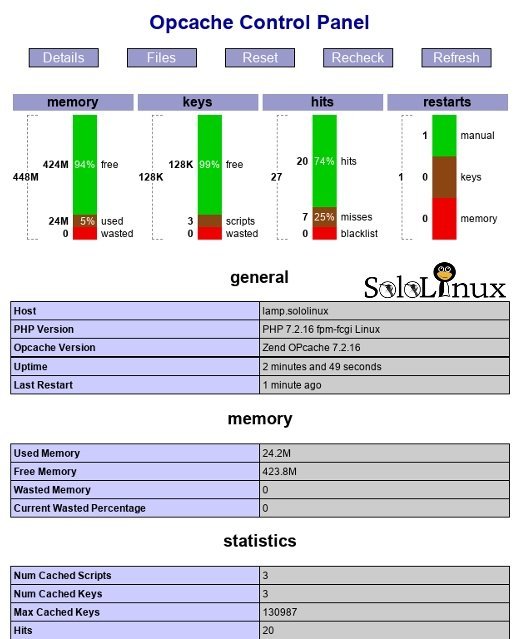
En esta pantalla es donde podrás manejar todo lo que crees en tu "oneinstack", los host virtuales, bases de datos, ftp's, etc... Ademas, en la parte superior derecha tienes unos accesos directos donde podrás consultar datos e información del servidor bastante útiles. Por ejemplo el consumo de "opcache"...
En cada apartado de la columna de la izquierda tienes una explicación de como operar. Por ejemplo para crear los host virtuales debes escribir en consola: ./vhost.sh
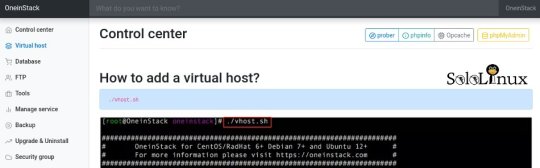
Como punto final... un apunte. La ejecución de los scripts de creación (en el ejemplo "./vhost"), debe ser desde el directorio propio de la pila. cd oneinstack Comparte el articulo. Read the full article
#basesdedatos#ftp#hostvirtuales#InstalarunapilaLAMP#lamp#LAPP#LEMP#lempstack#lempstack.com#Linux#LNMH#lnmp#LNMPA#LNMT#LNPP#navegadorweb#oneinstack#opcache#opensource#pilaLAMP#servidor#stack#vps
0 notes
Photo

Hadoop 3.x Installation on Ubuntu 18.04 Step By Step ☞ https://blog.usejournal.com/hadoop-3-0-installation-on-ubuntu-18-04-step-by-step-pseudo-distributed-mode-2808f6b8e71f #bigdata #mongodb
0 notes
Photo

Hadoop 3.x Installation on Ubuntu 18.04 Step By Step ☞ https://blog.usejournal.com/hadoop-3-0-installation-on-ubuntu-18-04-step-by-step-pseudo-distributed-mode-2808f6b8e71f #bigdata #mongodb
0 notes
Photo

Hadoop 3.x Installation on Ubuntu 18.04 Step By Step ☞ https://blog.usejournal.com/hadoop-3-0-installation-on-ubuntu-18-04-step-by-step-pseudo-distributed-mode-2808f6b8e71f #bigdata #mongodb
0 notes
Text
Ubuntu 18.10 "Cosmic Cuttlefish" Due Out Today, Arm Launches IoT-Focused Mbed Linux, GitHub's New Security Features, MongoDB Announces New Server Side License and Google to Charge for Apps on Android Handsets Sold in Europe
News briefs for October 18, 2018.
Ubuntu 18.10 "Cosmic Cuttlefish" expected to be released today. According to Phoronix, the biggest change for users will be the revised default theme for the GNOME Shell experience, now known as "Yaru". Ubuntu 18.10 will also have the Linux 4.18 kernel, "which means better hardware support, various performance improvements, and other optimizations compared to Ubuntu 18.04's Linux 4.15".
Arm launches the IoT-focused Mbed Linux OS and also extends Pelion IoT Platform services. According to Linux.com, Mbed Linux "combines the Linux kernel with tools and recipes from the Intel-backed Yocto Project. The distro also integrates security and IoT connectivity code from its open source Mbed RTOS". In addition, the Pelion IoT Platform "will align with Intel's Secure Device Onboard (SDO) provisioning technology to make it easier for IoT vendors and customers to onboard both x86 and Arm-based devices using a common Pelion platform. Arm also announced Pelion related partnerships with myDevices and Arduino."
GitHub updated its platform this week, which included many developer-centric changes and security features, but the most notable change is the "expansion of the Security Alerts feature, which also now supports Java and .NET projects, on top of the original JavaScript, Ruby and Python", ZDNet reports.
MongoDB recently announced it will be released under the new Server Side Public License: "The SSPL clarifies the conditions for making MongoDB publicly available as a service, to ensure we can continue to invest in building MongoDB for our users rather than in costly litigation over enforcing the AGPL. All subsequent versions and patch releases to prior versions of MongoDB made after October 16th, 2018 will be issued under the new SSPL."
Google plans to charge smartphone makers to pre-install apps like Gmail and YouTube on Android handsets sold in Europe. The Verge quotes Android leader Hiroshi Lockheimer, "Since the pre-installation of Google Search and Chrome together with our other apps helped us fund the development and free distribution of Android, we will introduce a new paid licensing agreement for smartphones and tablets shipped into the [European Economic Area]."
News
Ubuntu
Distributions
GNOME
ARM
IOT
GitHub
Security
MongoDB
licensing
Google
Android
Mobile
https://ift.tt/2AhhscJ via @johanlouwers . follow me also on twitter
0 notes
Text
How to install MongoDB 3.6 on Ubuntu
How to install MongoDB 3.6 on Ubuntu
This post is a quick how-to for installing MongoDB 3.6 on Ubuntu. (more…)
View On WordPress
0 notes
Text
flask docker vagrant mac inceptions
First, some vagrant preparation stuff, cos I docker doesn't play well on mac.
$ vagrant up $ vagrant plugin install vagrant-vbguest $ vagrant ssh $ sudo apt-get install -y virtualbox-guest-dkms virtualbox-guest-utils virtualbox-guest-x11 $ sudo apt-get install linux-image-extra-$(uname -r) linux-image-extra-virtual
The Vagrantfile I used looks like this.
# -*- mode: ruby -*- # vi: set ft=ruby : Vagrant.configure(2) do |config| config.vm.provider :virtualbox do |provider| provider.check_guest_additions = false provider.functional_vboxsf = false provider.memory = 1024 provider.cpus = 1 end config.vm.define "pewpew" do |pewpew| pewpew.vm.box = "ubuntu/trusty64" pewpew.vm.box_check_update = false pewpew.vm.box_download_insecure = true pewpew.vm.network "private_network", ip: "192.168.50.14", netmask: "255.255.255.0" pewpew.vm.hostname = "pewpew.mydomain.com" pewpew.vm.network "forwarded_port", guest: 80, host: 8080, auto_correct: true# <-- nginx pewpew.vm.network "forwarded_port", guest: 443, host: 8082, auto_correct: true# <-- nginx pewpew.vm.network "forwarded_port", guest: 5000, host: 5000, auto_correct: true# <-- flask / gunicorn pewpew.vm.network "forwarded_port", guest: 27017, host: 27017, auto_correct: true# <-- mongodb pewpew.vm.network "forwarded_port", guest: 2376, host: 2376, auto_correct: true# <-- docker-machine pewpew.vm.network "forwarded_port", guest: 8081, host: 8081, auto_correct: true# <-- image-generator pewpew.vm.synced_folder "~/Vagrant/docker/", "/srv/", owner: "root", group: "root" # add swap space pewpew.vm.provision :shell, inline: "fallocate -l 2G /swapfile && chmod 0600 /swapfile && mkswap /swapfile && swapon /swapfile && echo '/swapfile none swap sw 0 0' >> /etc/fstab" pewpew.vm.provision :shell, inline: "echo vm.swappiness = 10 >> /etc/sysctl.conf && echo vm.vfs_cache_pressure = 50 >> /etc/sysctl.conf && sysctl -p" end config.ssh.username = "vagrant" config.ssh.pty = true config.vm.provision "shell" do |shell| shell.privileged = true shell.inline = "sudo sed -i '/tty/!s/mesg n/tty -s \\&\\& mesg n/' /root/.profile" end end
My /etc/hosts file contains this line:
192.168.50.14 pewpew.mydomain.com
My working directory on my mac looks like this:
$ tree . ├── Vagrantfile ├── app │ ├── Dockerfile │ ├── index.py │ └── pewpew.wsgi ├── db │ └── Dockerfile └── rp ├── Dockerfile └── site.conf
This directory is mounted into the Vagrant vm at /srv.
Let's go through each file:
--- /srv/app/Dockerfile --- FROM python:2.7 RUN pip install --no-cache-dir Flask==0.10.1 RUN pip install --no-cache-dir gunicorn==19.3.0 RUN pip install --no-cache-dir eventlet==0.17.4 RUN pip install --no-cache-dir pymongo==3.4.0 COPY index.py /app/ COPY pewpew.wsgi /app/ EXPOSE 5000 WORKDIR /app CMD ["gunicorn", "-k", "eventlet", "-b", "0.0.0.0:5000", "-w", "1", "index:app"] --- /srv/app/index.py --- import os from flask import Flask from pymongo import MongoClient app = Flask(__name__) db = "mongodb" client = MongoClient(db, 27017) @app.route("/") def hello(): try: server_info = client.server_info() db_names = client.database_names() client.close() return "Pew Pew!\n%s\n%s\n" % (server_info, db_names) except: return "Pew Pew! DB failing...\n" if __name__ == '__main__': app.run() --- /srv/app/pewpew.wsgi --- import sys PROJECT_DIR = '/app/' sys.path.append(PROJECT_DIR) from pewpew import app as application --- /srv/db/Dockerfile --- FROM mongo EXPOSE 27017 --- /srv/rp/Dockerfile --- FROM nginx COPY site.conf /etc/nginx/conf.d/site.conf EXPOSE 80 443 --- /srv/rp/Dockerfile --- server { listen 80; server_name pewpew.mydomain.com; access_log /var/log/nginx/nginx_access_myapp.log; error_log /var/log/nginx/nginx_error_myapp.log; location / { proxy_pass http://flaskapp:5000/; } }
Ok let's start. ssh into the vagrant box and check the kernel. To use docker you need 3.10+ or sum chit...
$ vagrant ssh $ uname -r 3.13.0-98-generic
Ok cool, install the docker daemon.
$ sudo curl -sSL https://get.docker.com/ | sh
Now let's build these images from the three Dockerfiles we have.
$ sudo docker build -t reverseproxy /srv/rp/ $ sudo docker build -t flaskapp /srv/app/ $ sudo docker build -t mongodb /srv/db/ $ docker images REPOSITORY TAG IMAGE ID CREATED SIZE reverseproxy latest fa2ead9fdb67 11 minutes ago 107MB flaskapp latest 48ce64a24bea About an hour ago 681MB nginx latest b8efb18f159b 12 days ago 107MB python 2.7 fa8e55b2235d 13 days ago 673MB mongo latest b39de1d79a53 13 days ago 359MB
Start the database container first.
$ docker run -d -e DB_PORT_27017_TCP_ADDR='0.0.0.0' -v /srv/db:/data -p 27017:27017 --name mongodb mongo $ docker ps -a CONTAINER ID IMAGE COMMAND CREATED STATUS PORTS NAMES c610b1a11752 mongo "docker-entrypoint..." 3 seconds ago Up 1 second 0.0.0.0:27017->27017/tcp mongodb
Then start the flask application container.
$ docker run -d -p 5000:5000 --name flaskapp --link mongodb:mongodb flaskapp $ docker ps -a CONTAINER ID IMAGE COMMAND CREATED STATUS PORTS NAMES ebf6ba70b2f8 flaskapp "gunicorn -k event..." 2 seconds ago Up 1 second 0.0.0.0:5000->5000/tcp flaskapp c610b1a11752 mongo "docker-entrypoint..." 24 seconds ago Up 23 seconds 0.0.0.0:27017->27017/tcp mongodb
Send a request to the app
$ curl http://127.0.0.1:5000 Pew Pew! {u'storageEngines': [u'devnull', u'ephemeralForTest', u'mmapv1', u'wiredTiger'], u'maxBsonObjectSize': 16777216, u'ok': 1.0, u'bits': 64, u'modules': [], u'openssl': {u'compiled': u'OpenSSL 1.0.1t 3 May 2016', u'running': u'OpenSSL 1.0.1t 3 May 2016'}, u'javascriptEngine': u'mozjs', u'version': u'3.4.6', u'gitVersion': u'c55eb86ef46ee7aede3b1e2a5d184a7df4bfb5b5', u'versionArray': [3, 4, 6, 0], u'debug': False, u'buildEnvironment': {u'cxxflags': u'-Woverloaded-virtual -Wno-maybe-uninitialized -std=c++11', u'cc': u'/opt/mongodbtoolchain/v2/bin/gcc: gcc (GCC) 5.4.0', u'linkflags': u'-pthread -Wl,-z,now -rdynamic -Wl,--fatal-warnings -fstack-protector-strong -fuse-ld=gold -Wl,--build-id -Wl,-z,noexecstack -Wl,--warn-execstack -Wl,-z,relro', u'distarch': u'x86_64', u'cxx': u'/opt/mongodbtoolchain/v2/bin/g++: g++ (GCC) 5.4.0', u'ccflags': u'-fno-omit-frame-pointer -fno-strict-aliasing -ggdb -pthread -Wall -Wsign-compare -Wno-unknown-pragmas -Winvalid-pch -Werror -O2 -Wno-unused-local-typedefs -Wno-unused-function -Wno-deprecated-declarations -Wno-unused-but-set-variable -Wno-missing-braces -fstack-protector-strong -fno-builtin-memcmp', u'target_arch': u'x86_64', u'distmod': u'debian81', u'target_os': u'linux'}, u'sysInfo': u'deprecated', u'allocator': u'tcmalloc'} [u'admin', u'local']
Nice! Now let's try with the nginx container.
$ docker run -d -p 80:80 --name reverseproxy --link flaskapp:flaskapp reverseproxy $ sudo docker ps -a CONTAINER ID IMAGE COMMAND CREATED STATUS PORTS NAMES 716f3c7c321c reverseproxy "nginx -g 'daemon ..." 1 second ago Up Less than a second 0.0.0.0:80->80/tcp, 443/tcp reverseproxy ebf6ba70b2f8 flaskapp "gunicorn -k event..." 19 seconds ago Up 18 seconds 0.0.0.0:5000->5000/tcp flaskapp c610b1a11752 mongo "docker-entrypoint..." 41 seconds ago Up 39 seconds 0.0.0.0:27017->27017/tcp mongodb
Send a request to the nginx vhost.
$ curl http://127.0.0.1/ Pew Pew! {u'storageEngines': [u'devnull', u'ephemeralForTest', u'mmapv1', u'wiredTiger'], u'maxBsonObjectSize': 16777216, u'ok': 1.0, u'bits': 64, u'modules': [], u'openssl': {u'compiled': u'OpenSSL 1.0.1t 3 May 2016', u'running': u'OpenSSL 1.0.1t 3 May 2016'}, u'javascriptEngine': u'mozjs', u'version': u'3.4.6', u'gitVersion': u'c55eb86ef46ee7aede3b1e2a5d184a7df4bfb5b5', u'versionArray': [3, 4, 6, 0], u'debug': False, u'buildEnvironment': {u'cxxflags': u'-Woverloaded-virtual -Wno-maybe-uninitialized -std=c++11', u'cc': u'/opt/mongodbtoolchain/v2/bin/gcc: gcc (GCC) 5.4.0', u'linkflags': u'-pthread -Wl,-z,now -rdynamic -Wl,--fatal-warnings -fstack-protector-strong -fuse-ld=gold -Wl,--build-id -Wl,-z,noexecstack -Wl,--warn-execstack -Wl,-z,relro', u'distarch': u'x86_64', u'cxx': u'/opt/mongodbtoolchain/v2/bin/g++: g++ (GCC) 5.4.0', u'ccflags': u'-fno-omit-frame-pointer -fno-strict-aliasing -ggdb -pthread -Wall -Wsign-compare -Wno-unknown-pragmas -Winvalid-pch -Werror -O2 -Wno-unused-local-typedefs -Wno-unused-function -Wno-deprecated-declarations -Wno-unused-but-set-variable -Wno-missing-braces -fstack-protector-strong -fno-builtin-memcmp', u'target_arch': u'x86_64', u'distmod': u'debian81', u'target_os': u'linux'}, u'sysInfo': u'deprecated', u'allocator': u'tcmalloc'} [u'admin', u'local']
Awesome, we can also go to our http://pewpew.mydomain.com URL in a browser on our mac, as we have forwarded the port on our Vagrant box and added a local DNS entry in /etc/hosts remember?
0 notes